
Abstract
Automatic sliding door systems are integral to modern infrastructure, yet their operational complexity can lead to failures that disrupt access and compromise security. This analysis focuses on the dorma sliding door controller, the central processing unit governing the door's function. It examines the controller's role within the broader electromechanical system, which includes the motor, sensors, and power supply. The investigation delineates five common malfunctions: incomplete door travel, erratic movement, phantom activations, total system unresponsiveness, and the presentation of persistent error codes. For each fault, a systematic diagnostic methodology is proposed, linking observable symptoms to underlying electronic or mechanical causes. The discourse emphasizes the procedural steps for troubleshooting, from initial visual inspection and parameter adjustment to component-level testing and replacement. The objective is to provide facility maintenance personnel and technicians with a structured, empathetic framework for diagnosing and resolving issues with the dorma sliding door controller, thereby enhancing system reliability and minimizing downtime through informed repair strategies.
Key Takeaways
- Systematically diagnose issues by first observing door behavior and checking for obstructions.
- Understand the controller's error codes to pinpoint specific sensor or motor problems quickly.
- Adjusting sensitivity and alignment of sensors can resolve many phantom opening issues.
- Always verify power supply integrity before assuming the dorma sliding door controller has failed.
- Use a multimeter to test component voltage and resistance for accurate fault confirmation.
- Ensure carriage wheels and tracks are clean and undamaged to prevent erratic movement.
- Source high-quality, compatible replacement parts for long-lasting, reliable door repairs.
Table of Contents
- The Heart of the System: Deconstructing the Dorma Sliding Door Controller
- Fault 1: The Journey Unfinished - When the Door Won't Fully Open or Close
- Fault 2: The Stuttering Slide - Diagnosing Erratic and Jerky Door Movement
- Fault 3: The Phantom Presence - Why Your Door Opens for No Reason
- Fault 4: The Silent Standstill - Responding to a Completely Unresponsive System
- Fault 5: The Cryptic Message - Interpreting and Acting on Controller Error Codes
- Frequently Asked Questions
- The Path to Resolution
- References
The Heart of the System: Deconstructing the Dorma Sliding Door Controller
Before we can begin to address the maladies that can afflict an automatic door, we must first develop a sense of the system's anatomy and, most centrally, its nervous system. Imagine the entire automatic sliding door assembly as a body. The door panels are the limbs, the motor is the muscle that moves them, and the sensors are the eyes and ears, perceiving the world around them. At the center of this body, functioning as its brain, is the dorma sliding door controller. This sophisticated electronic unit is not merely a switch; it is a command center that receives information, makes decisions, and issues directives to orchestrate the seamless and safe passage of people.
The controller's fundamental task is to process inputs and generate appropriate outputs. Inputs arrive from a variety of sources: activation sensors (like microwave or infrared detectors) signal that someone is approaching, safety sensors (like presence-sensing beams) confirm that the threshold is clear, and internal feedback mechanisms report on the door's position and speed. Upon receiving an activation signal, the controller executes a complex sequence. It instructs the power supply to deliver a precise voltage to the Dunkermotoren motor, initiating the door's opening cycle. Simultaneously, it monitors the door's travel speed and position, often using an encoder on the motor, to ensure a smooth acceleration and gentle deceleration as it reaches the fully open position. It then holds the door open for a pre-programmed duration before checking the safety sensors and initiating a controlled closing cycle.
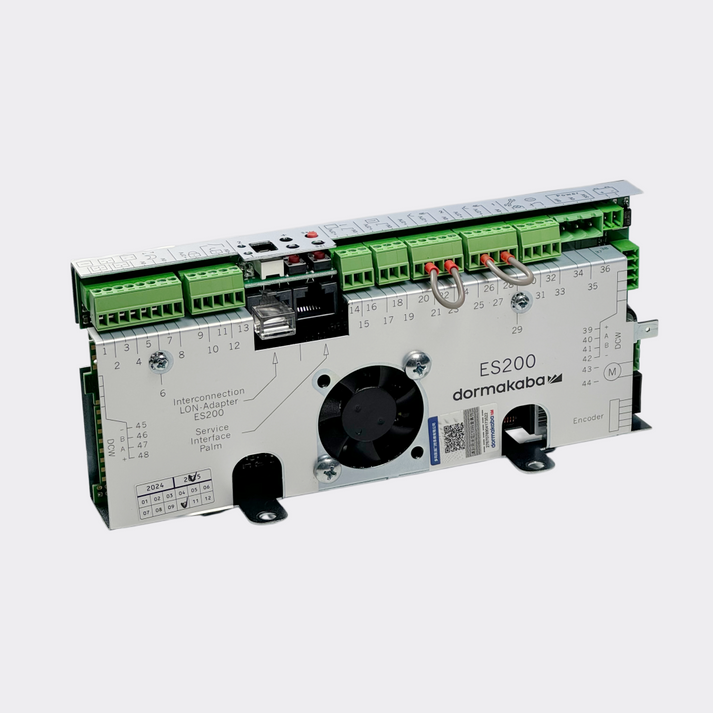
Within the enclosure of a product like the Dorma ES200, the controller board is a landscape of microprocessors, relays, terminals, and potentiometers. As detailed in technical documentation, these components manage everything from motor power to the logic for "Night/Bank" mode, which might allow one-way traffic or complete lockdown. Understanding this role is the first step in any diagnostic process. When a door misbehaves, it is rarely a spontaneous act of mechanical rebellion. More often, it is the controller faithfully executing a flawed command based on faulty information or struggling against a mechanical or electrical impediment. Our task, as diagnosticians, is to trace the symptoms back to their source, and that path almost always leads through the intricate circuits of the dorma sliding door controller.
A Comparative Look at Dorma Controller Models
Dorma, now part of dormakaba, has produced several controller iterations, each with advancing capabilities. While many principles remain the same, knowing the specific model you are working with is vital for accurate troubleshooting. The ES200 and the ESA II are two of the most prevalent systems you will encounter in the field. Think of the ESA II as a predecessor to the more modular and refined ES200 system. While both serve the same core function, their user interfaces, parameter adjustments, and diagnostic features differ.
The ESA II controller, for instance, often features a set of potentiometers and DIP switches directly on the board for adjustments, with diagnostics sometimes requiring interpretation of blinking LEDs. Its commissioning and maintenance instructions highlight a system that, while robust, represents an earlier generation of user interface design.
In contrast, the ES200 series introduced a more modular design and a more sophisticated control system. It was engineered to be flexible, allowing for easier expansion of functions without replacing the core operator. Many ES200 setups utilize a separate, handheld programming device that provides a clear text display for reading error logs and adjusting parameters, a significant leap in user-friendliness from deciphering LED blink patterns. The table below offers a simplified comparison to help you quickly identify and understand the system you are facing.
| Feature | Dorma ESA II Controller | Dorma ES200 Controller |
|---|---|---|
| User Interface | On-board potentiometers, DIP switches, LED indicators | External programming unit with digital display (in many cases) |
| Modularity | Less modular; expansions may require board changes | Highly modular; function modules can be added easily |
| Diagnostics | Error codes often displayed via blinking LED patterns | Detailed error codes and history accessible via programmer |
| Parameter Setting | Manual adjustment of physical potentiometers | Digital adjustment of parameters with precise values |
| Typical Application | Older installations, foundational automatic door systems | Modern commercial, high-traffic, and specialized installations |
Understanding these distinctions is not merely academic. If you are faced with an ESA II system, you will need the correct manual and a different mindset for troubleshooting than you would for an ES200. The ESA II Monitoring Manual, for example, provides specific flowcharts and diagrams for its electrical interface that are distinct from later models. Recognizing your model from the outset prevents wasted time and incorrect diagnostic procedures.
Fault 1: The Journey Unfinished - When the Door Won't Fully Open or Close
One of the most frequent complaints regarding automatic doors is a failure to complete their travel cycle. The door may stop short of its fully open position, or more commonly, it may fail to close completely, leaving a gap that compromises security and climate control. This symptom is not just an inconvenience; it is an indication that the delicate balance of forces and programmed limits within the system has been disrupted. The dorma sliding door controller is programmed with a precise understanding of the door's full travel distance, a parameter that is typically set during the initial installation and commissioning phase. When the door fails to reach these established endpoints, the controller may interpret it as an obstruction and halt movement as a safety precaution.
Identifying the Symptoms
The manifestation of this fault is straightforward. You will observe one of the following behaviors:
- The door opens but stops several inches, or even a foot, short of its standard open width.
- The door closes but leaves a discernible gap, ranging from a fraction of an inch to several inches. It may attempt to close, stop, and then slightly reopen.
- In some cases, the door may "creep" or move very slowly during the last portion of its travel, as if struggling against an unseen force.
Before immediately blaming the controller, it is essential to approach the problem with a sense of mechanical empathy. The controller is commanding the motor to move the door to a specific point. If it cannot get there, our first question should be: what is physically preventing it?
The Diagnostic Process
The Manual Check: The very first step is to disengage the power to the operator. This is a critical safety measure. Once the system is de-energized, manually slide the door panels by hand through their entire range of motion. Does the door move freely? Are you feeling any binding, grinding, or points of increased resistance? Pay close attention to the final few inches of travel in both directions. Often, a small stone, debris in the floor track, or a misaligned bottom guide can create just enough friction to stop the motor. The carriage wheels themselves can become worn or damaged, causing the door to bind in the overhead track. If you find a physical impediment, clearing it or replacing the damaged component may be the complete solution.
Inspect the Belt and Tension: While the power is off, inspect the drive belt. Is it properly tensioned? A loose belt can slip on the motor's drive cog, especially at the beginning or end of the cycle when inertia is being overcome. This slippage can cause the controller to lose its accurate count of the door's position, leading it to stop prematurely. Conversely, a belt that is excessively tight places an undue strain on the motor and idler pulley, which can also impede movement.
Re-evaluating the Programmed Limits: If the door moves freely by hand, the problem likely lies within the system's electronic settings. After years of operation, mechanical wear can cause slight shifts in the door's "home" and "fully open" positions. The controller, still operating on its original programmed limits, may now be trying to drive the door to a point that is no longer physically achievable. This is where the specific model of your dorma sliding door controller becomes important. For an ES200 system, you would connect the programming unit and navigate to the parameter settings for door travel limits. The procedure often involves putting the controller into a "learn" or "setup" mode, which allows it to slowly cycle the door to find the physical endpoints and record them as the new standard. For an ESA II, this might involve adjusting a specific potentiometer on the control board itself. Consulting the correct technical manual is non-negotiable here. By running a new setup cycle, you are effectively re-teaching the controller the physical reality of the doorway.
Fault 2: The Stuttering Slide - Diagnosing Erratic and Jerky Door Movement
A properly functioning automatic door should move with a quiet, confident grace. Its motion should be a smooth, continuous glide from closed to open and back again. When that movement becomes hesitant, jerky, or noisy, it is a clear sign of an underlying problem. This erratic behavior is not only unsettling for users but can also signify a condition that is placing excessive strain on the drive components, potentially leading to a more catastrophic failure if left unaddressed. The dorma sliding door controller is designed to manage a smooth power curve to the motor, but it can only do so if the electrical and mechanical systems are operating within their expected parameters.
Reading the Signs of Instability
Erratic movement can manifest in several ways:
- Stuttering Start: The door hesitates or jerks as it begins to open or close.
- Pulsing Motion: Instead of a smooth slide, the door seems to move in small, rapid pulses.
- Inconsistent Speed: The door may speed up and slow down unexpectedly during its travel cycle.
- Audible Strain: The movement is accompanied by grinding, groaning, or chattering sounds from the operator housing.
These symptoms point to an inconsistency in the application of force or the feedback the controller is receiving. Imagine trying to push a heavy cart with a wheel that is flat on one side. Your effort might be consistent, but the cart's movement would be jerky and uneven. Similarly, the controller may be sending a steady signal, but a problem "downstream" is corrupting the result.
A Path to a Smooth Solution
Revisit the Mechanicals: As with incomplete travel, the first area of investigation must be the physical path of the door. An immense number of "controller" problems are, in fact, mechanical problems in disguise. Power down the system and move the door by hand. The stuttering you observed under power may translate to a tangible bump or point of resistance when moved manually. Pay extremely close attention to the carriage assemblies—the wheel-and-bracket units that hang the door from the overhead track. Worn or cracked carriage wheels are a primary cause of jerky motion. Inspect each wheel for flat spots, cracks, or seized bearings. A single faulty wheel can disrupt the entire system. Also, ensure the track itself is clean and free of dents or warping.
Examine the Power Supply and Motor: If the mechanical path is clear, the next logical step is to examine the power and drive system. A fluctuating power supply can cause the motor to behave erratically. With a multimeter, and exercising extreme caution while working with live electricity, check the voltage being supplied to the dorma sliding door controller. Is it stable and within the manufacturer's specified range (typically found in the technical manual)? Next, consider the motor itself. The carbon brushes in a DC motor, like the Dunkermotoren units commonly used, are wear items. As they wear down, their contact with the motor's commutator can become inconsistent, leading to intermittent power delivery and jerky operation. Inspecting the brushes and commutator for wear or excessive carbon dust can be a key diagnostic step. A worn motor may draw more current than usual, which the controller might interpret as an obstruction, causing it to pulse the power in an attempt to overcome the perceived blockage.
Controller Parameter Check: If both the mechanicals and the motor seem sound, it's time to interrogate the controller's settings. Parameters such as "Opening Speed," "Closing Speed," "Acceleration," and "Braking" can be adjusted. It is possible that these settings have been inadvertently changed or are no longer appropriate for the current state of the door. For example, an acceleration setting that is too aggressive for a very heavy door panel can cause a stuttering start. Using the programmer for an ES200 or adjusting the potentiometers on an ESA II, you can try reducing the acceleration or top speed slightly to see if the motion smooths out. This is a process of fine-tuning, not of making drastic changes. Document the original settings before you make any adjustments so you can always return to the baseline.
Fault 3: The Phantom Presence - Why Your Door Opens for No Reason
Perhaps the most perplexing and sometimes eerie malfunction is the "phantom" or "ghost" activation. The door opens and closes seemingly of its own accord, with no person or object in the vicinity. This is not only a waste of energy and a strain on the components, but it can also pose a significant security risk, especially after hours. This behavior is almost always a problem of perception; the door's "senses" are being tricked. The dorma sliding door controller is acting on an activation signal it believes to be legitimate. Our job is to become a sensory detective and find the source of this false signal.
Symptoms of a Hyper-Sensitive System
The primary symptom is obvious: the door cycles open without a person approaching. However, there can be subtleties to observe:
- Does it happen at specific times of day?
- Does it correlate with changes in weather (sunlight, rain, wind)?
- Does it happen when other equipment nearby (like HVAC systems or large lights) turns on?
- Does the door open fully, or just partially, before closing again?
These details are clues. For instance, activations that correlate with sunlight changes might point to an infrared sensor issue, while activations linked to wind could suggest a loose-hanging sign or plant moving in the sensor's field of view.
Calibrating the Senses: A Diagnostic Guide
The vast majority of phantom activations are caused by the activation sensors, such as a dorma sliding door sensor, which are typically microwave (radar) or active/passive infrared units mounted above the door.
Environmental and Field-of-View Inspection: Begin by standing outside the sensor's activation zone and carefully observing its environment. Is there a hanging plant, a reflective sign, or even a flag that could be moving in the wind and triggering the sensor? Is there a shiny, polished floor that could be reflecting sunlight into an infrared sensor at certain times of day? Is there a large metal object, like a rolling security grille, that could be reflecting the microwave sensor's energy in unpredictable ways? The first step is to eliminate these environmental factors. Sometimes, simply cleaning the sensor's lens can resolve the issue.
-
Sensitivity and Field Adjustment: Every activation sensor has adjustments for both sensitivity and the size/shape of its detection field. Often, these are set too high during installation. A microwave sensor with its sensitivity turned to maximum might be able to detect movement on the other side of a non-metallic wall. An infrared sensor with too wide a field might detect traffic moving on the street outside.
- Microwave (Radar) Sensors: These usually have a small potentiometer or digital setting to adjust sensitivity (or range). Reduce the sensitivity in small increments, testing after each adjustment, until the door no longer false-triggers but still reliably opens for an approaching person.
- Infrared (IR) Sensors: These often have adjustments for sensitivity as well as mechanical shutters or electronic settings that shape the detection pattern. You want to aim the detection pattern so that it only covers the area immediately in front of the door, creating a well-defined "active zone." You do not want it looking down the entire length of a hallway or out into the parking lot.
Checking for Interference and Crosstalk: In a bi-parting door system with sensors on both sides, it is possible for the microwave signals to interfere with each other, a phenomenon known as crosstalk. This can sometimes be resolved by changing the frequency channel on one of the sensors (if available) or by ensuring they are not mounted directly opposite each other. Electrical "noise" from other sources can also be a culprit. Are the sensor wires run in the same conduit as high-voltage lines? This is poor practice and can induce false signals. The dorma sliding door controller itself is shielded, but its input terminals can be susceptible to noisy signals coming from poorly installed sensor wiring.
Quick-Reference Troubleshooting Table
To consolidate our diagnostic thinking, a quick-reference table can be an invaluable tool for technicians in the field.
| Symptom | Probable Cause(s) | Initial Diagnostic Steps |
|---|---|---|
| Door won't fully close | Debris in track; Misaligned guide; Incorrect programmed limits | Power off; Manually slide door to check for binding; Run setup/learn cycle |
| Jerky/Stuttering motion | Worn carriage wheels; Loose drive belt; Worn motor brushes | Power off; Manually slide door to feel for bumps; Inspect wheels and belt tension |
| Door opens randomly | Sensor sensitivity too high; Environmental triggers (wind, light); Sensor interference | Observe sensor environment; Reduce sensor sensitivity; Adjust sensor field shape |
| System is dead (no power) | Tripped breaker/blown fuse; Faulty power supply; Damaged wiring | Check main circuit breaker; Test outlet voltage; Inspect wiring for damage |
Fault 4: The Silent Standstill - Responding to a Completely Unresponsive System
There is perhaps no clearer indication of a problem than a complete lack of response. The door is motionless. The sensors do not seem to register an approach. The system is, for all intents and purposes, dead. This scenario can be intimidating, as it suggests a fundamental failure. However, by approaching it systematically, we can move from the source of power inward to the controller, logically eliminating possibilities along the way. In this situation, the dorma sliding door controller may be a victim rather than the cause, starved of the electricity it needs to operate.
Confirming a Total System Failure
The symptom is a lack of any activity. The door does not attempt to move. If the controller or its associated components have indicator lights, they are likely off. There is no hum from the operator, no click of a relay. It is important to distinguish this from a door that is simply locked in "Off" or "Night" mode. Always check the program switch or keypad first. It may seem elementary, but it is a common oversight. Assuming the door is set to "Automatic," the lack of response points to a deeper issue.
Tracing the Flow of Power
The diagnostic process for a dead system is a journey that follows the path of electricity. You will need a reliable multimeter for these steps.
Start at the Source: The first and most obvious place to check is the circuit breaker panel. Has the breaker for the automatic door tripped? If so, you can try resetting it once. If it trips again immediately, there is a short circuit somewhere in the system that must be found before proceeding. Do not repeatedly reset a tripping breaker. If the breaker is on, the next step is to verify power at the electrical outlet or junction box that feeds the operator. Use your multimeter to confirm that you have the correct voltage (e.g., 120V AC in the United States). If there is no power here, the problem lies with the building's electrical wiring, not the door operator.
The Power Supply Unit: Automatic door operators do not run directly on high-voltage AC. They have an internal power supply that converts this into low-voltage DC to run the controller and motor. This is often the next point of failure. After confirming power is entering the operator housing, you need to test the output of the power supply unit. Disconnect the power supply from the dorma sliding door controller (after turning off the main power at the breaker). Power the system back on briefly and carefully test the output terminals of the power supply with your multimeter set to DC volts. The technical manual will specify the expected output voltage, typically 24V DC. If you are not getting the correct voltage (or any voltage at all), the power supply has failed and needs to be replaced.
Inspecting the Controller and Fuses: If the power supply is delivering the correct voltage, the next stop is the controller board itself. Visually inspect the board for any obvious signs of damage: burn marks, bulging capacitors, or a distinct "burnt electronics" smell. Many controllers have one or more fuses directly on the board to protect the sensitive microelectronics. These are often small glass or ceramic fuses. Carefully remove them and test for continuity with your multimeter. A blown fuse is often a symptom of another problem (like a shorted motor or a voltage spike), but replacing the fuse may restore operation, at least temporarily. If a new fuse blows immediately, you have a more serious short circuit to investigate. If the fuses are good, the power supply is good, and there are no visible signs of damage, yet the controller remains unresponsive, you have reached the point where the dorma sliding door controller itself is the most likely culprit. Internal component failure on the board can be difficult or impossible to diagnose without specialized electronic testing equipment. In such cases, replacing the controller is the most practical and reliable solution. A quality replacement, such as a compatible Dorma ES200 controller board, ensures that you are restoring the system with a part designed for direct-fit and reliable performance.
Fault 5: The Cryptic Message - Interpreting and Acting on Controller Error Codes
Modern automatic door controllers are not silent when they are in distress. Many, especially more advanced models like the Dorma ES200, are equipped with self-diagnostic capabilities. When the controller detects a fault, it will often stop operation and display an error code. This code is not a sign of defeat; it is a message from the brain of the system, a piece of crucial intelligence that can direct your troubleshooting efforts with remarkable precision. Learning to access and interpret these codes transforms you from a guess-worker into a skilled technician. Ignoring them is like a doctor ignoring a patient's description of their pain.
Accessing the Diagnostic Information
The method for retrieving error codes varies by model.
- Dorma ESA II: This controller often communicates through a series of blinks on an LED indicator. The maintenance manual provides a table that translates these blink patterns (e.g., "three short blinks, one long blink") into specific fault types, such as "Safety Beam Interruption" or "Motor Encoder Fault". This requires careful observation and the correct manual for interpretation.
- Dorma ES200: This system typically offers a much more user-friendly experience. By connecting a dedicated Dorma programming unit, you can access a menu that displays the current error code in plain text or as a numerical code. Even more valuable, it often stores a history of past errors. This log can reveal intermittent problems that may not be active when you are on-site. For example, if the log shows repeated "Safety Beam" errors every morning, it might point to an issue with morning sunlight interfering with the dorma sensor sliding door system.
From Code to Correction: A Guided Approach
Once you have the error code, the next step is to use it as your guide. Let's walk through a few common examples to understand the thought process.
-
Error: "Safety Device Activated" or "Beam Interruption"
- Meaning: The controller believes the safety beam across the threshold is blocked. This is a common cause for a door that will not close.
-
Diagnostic Steps:
- First, perform a visual check. Is there a box, a floor mat, or a piece of debris physically blocking the beam's path?
- Clean the lenses of both the transmitter and receiver units of the safety beam. A layer of dust or grime can be enough to block the signal.
- Check the alignment. The transmitter must be aimed directly at the receiver. Often, one of them can get bumped out of alignment. Most units have an indicator light that will illuminate when they are correctly aligned and receiving a signal.
- Check the wiring to both the sensor and the dorma sliding door controller. A loose connection or a damaged wire can mimic a blocked beam.
-
Error: "Motor Encoder Fault" or "Lost Position"
- Meaning: The controller is not receiving the expected feedback from the small encoder that tracks the motor's rotation and, by extension, the door's position.
-
Diagnostic Steps:
- This can sometimes be caused by the mechanical issues we discussed earlier, like a slipping belt or a severe jam. If the motor turns but the door does not move, the controller will register a discrepancy and throw this error.
- Inspect the wiring harness that connects the motor's encoder to the controller. This is often a small, multi-pin connector that can become loose or damaged.
- If the mechanics and wiring are sound, the fault may lie with the encoder itself (which is often integrated with the motor) or the input-processing circuit on the dorma sliding door controller. This often requires replacing the motor/encoder assembly.
-
Error: "Overcurrent Detected"
- Meaning: The motor is drawing more electrical current than the controller deems safe. This is a critical safety feature to prevent overheating and fire.
-
Diagnostic Steps:
- This error almost always points back to a mechanical problem. The motor is working too hard. Power down the system and perform the manual slide test. You are looking for significant binding or resistance that would force the motor to strain.
- A failing motor with worn bearings or shorting windings can also cause an overcurrent condition. If the door moves freely by hand, the motor itself becomes the primary suspect.
By treating an error code as the starting point of your investigation, not the conclusion, you can work efficiently and accurately. The code tells you where the system is feeling pain; your job is to determine why.
Frequently Asked Questions
What is the average lifespan of a dorma sliding door controller?
The lifespan of a dorma sliding door controller can vary significantly based on factors like usage intensity, environmental conditions (temperature, humidity), and the quality of the electrical supply. In a typical commercial setting with regular maintenance, a controller can reasonably be expected to last 7-10 years. However, in high-traffic environments like airports or hospitals, or in locations with unstable power, this lifespan may be shorter. Component failure is often gradual, heralded by intermittent issues before a complete breakdown.
Can I upgrade my older Dorma ESA II controller to a newer ES200?
Upgrading from an ESA II to an ES200 is generally not a simple plug-and-play swap of the controller board. The ES200 system is designed as an integrated package, including the operator, motor, and power supply, which are all designed to work together. While it might be technically possible for a highly experienced technician to adapt an ES200 controller to an older operator, the most reliable and recommended path is to upgrade the entire operator assembly. This ensures all components are matched and covered by a single manufacturer's warranty.
How do I perform a factory reset on my dorma sliding door controller?
Performing a factory reset can be a useful troubleshooting step, as it returns all adjustable parameters to their default settings. The procedure varies by model. For many ES200 controllers, this function is accessed through the handheld programming unit, usually within a "Service" or "Advanced" menu. For an older ESA II, it might involve a specific sequence of powering on the unit while holding down a button or shorting a jumper on the circuit board. It is absolutely critical to consult the specific technical manual for your model before attempting a reset, as an incorrect procedure could render the controller inoperable.
Is it more cost-effective to repair a controller or replace it?
For minor issues like a blown, user-replaceable fuse, repair is obviously the answer. However, when dealing with suspected on-board component failure (e.g., a faulty microprocessor or relay), replacement is almost always the more cost-effective and reliable option. The cost of labor for a technician to diagnose and replace a single component on a complex circuit board, without a guarantee of success, often exceeds the cost of a new or refurbished controller board. Replacement offers a known-good part with a warranty, minimizing downtime and repeat service calls.
Where can I find the model number for my dorma sliding door controller?
The model number is typically printed on a label directly on the controller's main circuit board or its plastic housing. When you remove the main cover of the operator assembly (the long metal box above the door), you should be able to locate the controller. The label will usually contain the model number (e.g., "ES 200," "ESA II"), a part number, and a serial number. Having this information is essential when ordering replacement parts or seeking technical support.
The Path to Resolution
Navigating the complexities of a modern automatic door system requires a blend of mechanical intuition and electronic logic. The dorma sliding door controller stands at the nexus of this system, a powerful but sensitive component that demands a methodical approach to diagnosis. By resisting the urge to jump to conclusions and instead following a structured path—from observing the symptoms and checking the physical mechanics to interrogating the controller's settings and error codes—you empower yourself to find the true root of the problem.
This process is one of empathy for the machine. A door that stutters is not being difficult; it is struggling against resistance. A door that opens for a phantom is not haunted; it is being misled by a hyper-sensitive sensor. And a system that is silent is often simply starved of the electrical energy it needs to function. By understanding the controller's role as the brain and interpreting its signals and behaviors, you can move from frustration to effective action. Whether the solution is as simple as clearing debris from a track or as definitive as installing a new high-quality automatic door controller, a patient and knowledgeable approach will always lead to a more reliable and lasting repair.